Detailed use
This page presents the system elements in their usual order of use: the global management point, central logic, speakers, conversations, then display data and input.
1. Game Instance Subsystem
The Game Instance Subsystem is the global access point for ADS Dialog System. It is available throughout the game session.
Access
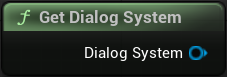
In Blueprint, use the Get Dialog System function. It directly returns the active dialog logic: the result of Get Dialog Logic (Typed).
Functions
| Function | Description |
|---|---|
Get Dialog System | Returns the active dialog logic, which is the result of Get Dialog Logic (Typed). |
Blueprint logic
The Subsystem uses BP_ADS_DialogSystem as its central logic. This Blueprint logic is created and retained by the Subsystem throughout the game session. It is separated from the Subsystem so it can be extended more easily in your project without modifying the system's central behaviour.
2. Central logic BP_ADS_DialogSystem
Central logic is where you connect ADS Dialog System to your project. It can be extended in Blueprint to apply game rules, open widgets, or react to a conversation's flow.
Parameters
| Name | Description |
|---|---|
Acceptable Distance | Distance used to consider a speaker close enough during a conversation. |
Auto Next | Default value that enables automatic progression to the next line. It can be changed at Runtime. |
Seconds Per Word | Time used to calculate automatic progression to the next line from its word count. |
Min Duration | Minimum display duration for a line, even when its text is short. |
Dialog Context | Input Mapping Context used for dialog commands. |
Travel Context | Input Mapping Context used for Travel-mode conversations. |
Camera Presets | Collection of camera presets available for lines. |
Current IETF | Default IETF culture code used by the system, for example en-US. |
Dynamic Text Data Table | Data Table used to replace dynamic text tags, for example {{TownName}}. |
3. Actor Component AC_ADS_Dialog
AC_ADS_Dialog is the component that connects an Actor in your game to the dialog system. Add it to the Blueprint of every Actor that must be used as a speaker, then configure its data and conversations.
Add and connect the component
In the speaker Blueprint, add AC_ADS_Dialog from the Components panel. The component must remain attached to the relevant Actor. Then configure its speaker data and the conversations in which this Actor can participate.
Parameters
| Name | Description |
|---|---|
Acceptable Distance | Distance at which interaction with the speaker is considered possible. |
Collision Radius | Radius used by the component for its detection area. |
Avatar | Avatar data used to represent the speaker in dialog. |
Conversations | List of all game conversations associated with this speaker, including those disabled by default. They can be enabled at Runtime by your project or by a previous conversation. |
Functions
| Function | Description |
|---|---|
Find Nearest NPC | Searches for the closest NPC that can be used by dialog. |
Find Conversation | Searches for a conversation associated with the speaker. |
Is Conversation Enabled | Indicates whether a conversation is currently enabled. |
Hide Widget | Hides the dialog widget associated with the component. |
4. Speaker Asset PDA_Speakers
PDA_Speakers is the data asset used to define a speaker. Create a child asset for every speaker in your project, such as DA_Player for the player or DA_NPC for an NPC, then associate it with the AC_ADS_Dialog component of the corresponding Actor.
Parameters
| Name | Description |
|---|---|
Speaker Name | Name displayed for the speaker in dialogs. |
Avatar | Visual definition of the speaker avatar. |
5. Conversation Asset PDA_ConversationParent
PDA_ConversationParent is the parent asset for your conversations. Create a child asset for every conversation in your project, then add this asset to the Conversations list of AC_ADS_Dialog.
The Conversations list contains conversations for the entire game, including those that are not yet available. An end-game conversation can therefore be assigned from the start, remain disabled by default, then be enabled at Runtime by a project event or a previous conversation.
General parameters
| Name | Description |
|---|---|
Enabled | Defines whether the conversation is currently available. This value can be changed at Runtime. |
Is Travel Conversation | Defines whether the conversation uses Travel mode. When disabled, the conversation uses Classic mode. |
Lines
Lines contains the conversation lines. Each item is a line and has the following parameters:
| Name | Description |
|---|---|
Speaker | Speaker Asset that says the line. |
Text | Line text. It can contain Rich Text, icons, variables, and portions resolved by functions. |
VoiceLine | Map of Voice Lines associated with the line. |
BubbleSpeach | Dialog bubble type used for the line. |
BubbleAppear | Appearance used by the dialog bubble. |
Camera.ChangeCamera | Defines the camera change applied during the line. |
Camera.CameraPreset | Camera preset used when the line changes the camera. |
Camera.DurationChange | Duration used for the camera change. |
EventName | Name of the event to trigger during the line. This Event must exist in the conversation asset. |
AutoNextDuration | Duration before automatically progressing to the next line. |
bForceAutoNext | Forces automatic progression for this line. |
Choices
Choices contains the choices offered to the player.
| Name | Description |
|---|---|
Text | Text displayed for the choice. |
Conversation | Conversation launched when the player validates this choice. |
Conversation activation
| Name | Description |
|---|---|
Deactivate Conversations | List of conversations to disable when this conversation ends. |
Activate Conversations | List of conversations to enable when this conversation ends. |
6. Text, bubbles, and display
Structures and Data Tables in Data prepare the display of dialog lines.
Dynamic text and Rich Text
Data Tables in Data/Tables prepare the text displayed by dialog lines.
Create dynamic text
- Add a row in
DT_DialogDynamicText. - Set its
Tagand theTextthat must replace it. - In a dialog line, use this tag between double braces.
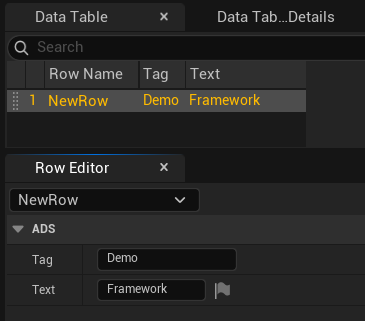
For example, if the Tag is Demo and the Text is Framework, a line containing {{Demo}} is replaced with Framework during playback.
Display a value through a function
Resolve Expression is already overridden in BP_ADS_DialogSystem.
- Open the
Resolve Expressionfunction inBP_ADS_DialogSystem. - On the
Switch on Stringnode, add a pin with the desired function name, for exampleUserName. - Implement the logic for this pin, then return the text to display.
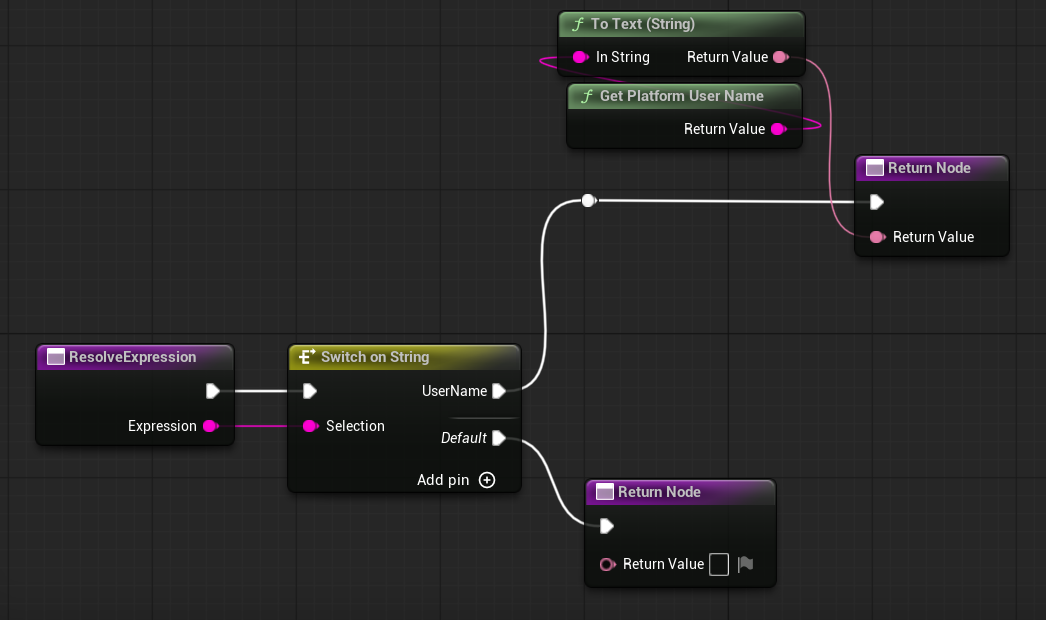
In a dialog line, call the function with the syntax {{=FunctionName()}}. For example, {{=UserName()}} calls the UserName pin on Switch on String.
Create a Rich Text style
- In
DT_RichText_Dialog, add a row with the desired style name, for exampleyellow. - Configure this style in the Data Table.
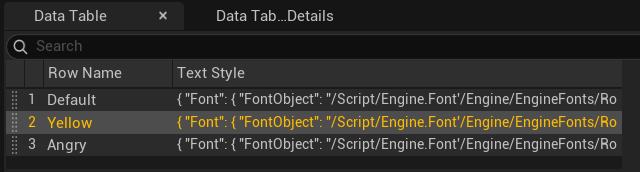
In dialog text, the opening tag uses the row name: <RowName>. The closing tag is always </>.
For example, for the yellow row, use <yellow>portion</>: only portion uses the yellow style.
Icons used in text are defined in DT_TextIcon.
UI and Menu
MENU_Dialog, W_DialogAuto, W_DialogButton, W_DialogNPC_Icon, and UI_DialogTravel are widgets used directly by the system. Edit their appearance to adapt the interface to your project.
Do not modify elements defined as variables. Only visual customization is allowed.
Create a bubble style
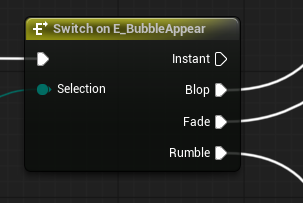
- Add the new style to the
E_BubbleAppearenum. - In
MENU_Dialog, add the corresponding widget toWidgetSwitcher_Bubble. - Edit the
SetLineEvent and, on theSwitch on E_BubbleAppearnode, add the logic that displays this style.
7. Input
The Inputs folder contains IMC_Dialog and the system Input Actions: IA_Dialog_Up, IA_Dialog_Down, IA_Dialog_Validate, IA_Dialog_Skip, and IA_Dialog_Auto. Use them to connect player commands to choice navigation, validation, skipping, and automatic playback.